Microchip Graphics Suite (MGS) Simulator Button Example
Introduction
This guide shows how to develop a simple Button example using the Microchip ecosystem - Microchip Graphics Suite (MGS) Composer, MPLAB® X IDE, MPLAB Code Configurator (MCC), MGS Simulator.
This guide shows how easy it is to develop a graphics application using the MGS Simulator and port it to the desired target once the application is ready.
Required Hardware and Software
For this training, the required hardware are as follows:
- EV40E67A SAM9X60 Curiosity Development Board.
- A Micro-USB cable to power the board.
- High-Performance WVGA Display Module with maXTouch® Technology.
- External Segger JTAG debugger such as J32 Debug Probe.
The required software is as follows:
Description of Example Application
In this training session, we will create a straightforward button example with a couple of buttons that change the visibility of labels. The design has a single layer with very few assets. Below is a description of the GFX User Interface and its functionality.
- The Press Me button will toggle the visibility of the "Hello World!" label.
- The Toggle button will alternately display "Button Toggle On!" and "Button Toggle Off!" labels.
Getting Started with the Application
This section will teach us how to use MPLAB X IDE to create the Button example.
Create an MCC Project
We start by creating an MCC project.
Click on the New Project icon.

Select Application Project(s), click Next.

In the Device textbox, type “sam9”, from the resulting list and choose SAM9X60D1G. Click Next.

Select XC32 (v4.40) as the compiler. Click Next.

In the last window, enter the Project Name and Project Location. Leave the Set as main project and Open MCC on Finish boxes checked. Click Finish.

This will launch the MCC Content Manager Wizard. Click Select MPLAB Harmony.

From the MCC Harmony Content Manager, choose the mandatory library for installation (bsp, csp, core, Devices, dev_packs, and gfx). If the required SW is already installed, the Content Manager will display a notification indicating that it is already in place. Click Finish.

Build the Project Graph
Next, we will build the Project Graph by adding the necessary resources and configuring them. For this example, we build the project graph as explained in the following steps.
From the MCC Resource Management tab, select the following components from Device Resources by clicking on the add icon under Libraries > Harmony > Graphics > Simulator > MGS Web Simulator.

This will ask you to add:
- Harmony Core component. Say Yes.
- FreeRTOS component. Say No.
Right-click on the yellow diamond against LE Display Driver of the MGS Web Simulator component and from the list of Consumers, choose Legato.

Right-click on the yellow diamond against TMR of the MGS Web Simulator component and from the list of Consumers, choose TIME (sys_time).

Select MGS Web Simulator from the project graph. From the Configuration Options tab find the Display Type, and choose WVGA.

The project graph now looks as shown:

Designing GUI with MGS Composer
With the MCC project created and the project graph ready, we will design the GUI using MGS Composer. For this training, we will use a pre-made design.
Download the to the project at the location, GFX_Sim_Button\src\config\default.
From the Project Graph > Plugins drop-down menu, launch Microchip Graphics Composer.
 If the project is not automatically opened in MGS Composer, click Load an existing project and choose the design file from Step 1. The composer displays the project design as shown in the accompanying image.

Keeping the MGS Composer open, from the Resource Management [MCC] tab, click Generate.

Application Code - Example
The Button example can be downloaded from GitHub.
Copy the app.c file to your project.
Take the time to observe the application code in app.c.
Building the Application Using MGS Simulator
Using the MGS Simulator in Web Mode
To run the GFX demo application on the Simulator in Web mode, follow the tutorial steps:
Launch the project in MGS Simulator by double-clicking default.mgsws generated by MCC in the GFX_Sim_Button\src\config\default folder as explained in the "Designing GUI with MGS Harmony Composer" section.
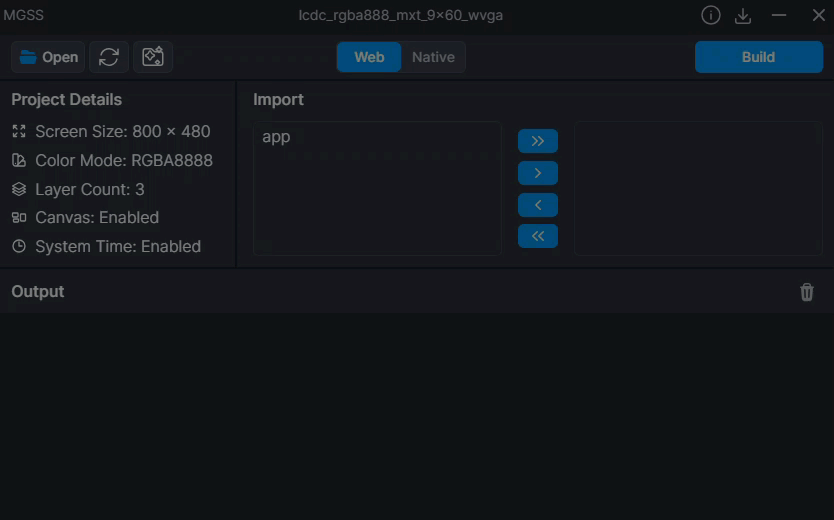
Make sure that the Simulator is in web mode. To build the project, import the application file and click Build as shown in the accompanying graphic.
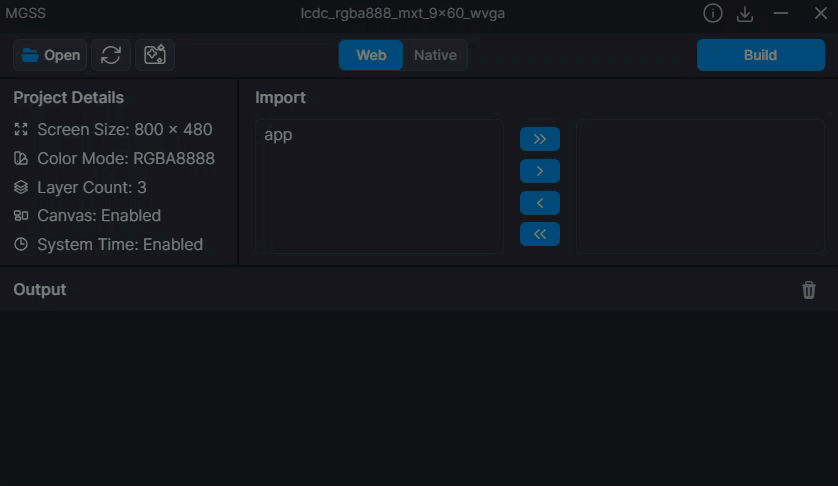
On a successful build, you should see an output as shown in the accompanying image, including a link to the generated HTML file. Click on the link (highlighted) to launch the MGS Simulator output on your default web browser.

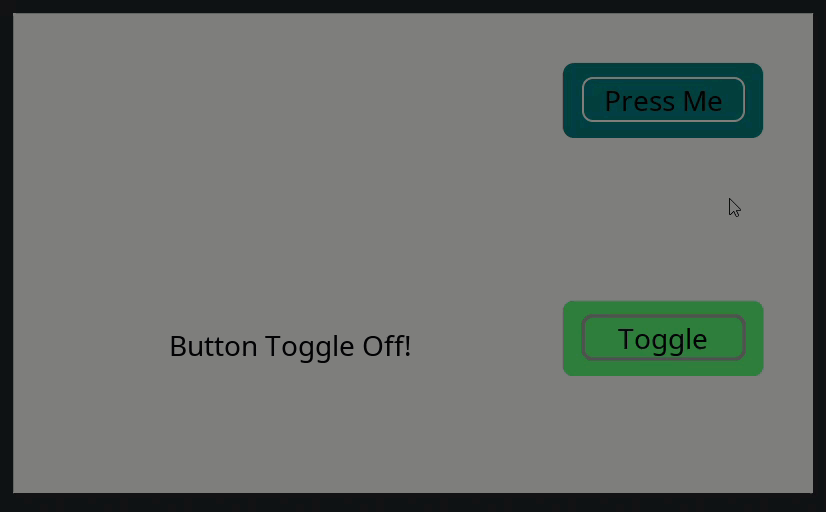
MGS Simulator Output
To interact with the MGS Simulator output:
- Click on the Press Me button to see the visibility of the "Hello World!" label toggle.
- Click on the Toggle button to see the accompanying text alternate between "Button Toggle On!" and "Button Toggle Off!".
Using the MGS Simulator in Native Mode
To run the GFX demo application on the Simulator in Native mode, follow the tutorial steps:
Launch the project in MGS Simulator by double clicking default.mgsws generated by MCC in the GFX_Sim_Button\src\config\default folder as explained in the "Designing GUI with MGS Harmony Composer" section.
Make sure that the Simulator is in Native mode. To build the project, import the application file and click Export as shown in the accompanying graphic.
From the Export pop-up window, choose any location to export the cmake project. In the output console, you will immediately see a log message that the project export is complete.

Right-click on the folder to which the project was exported. You may have to hold down the shift key. Click on Open with Code.

VS Code is launched with the project. In the pop-up window, click the Yes, I trust the authors button.

Press F5 on your keyboard to build and run the demo in Debug mode. Alternately, click on the Run and Debug icon, then click the Debug button.

The demo application is launched in a separate window. Step through the code using the debug icons.

Explore the application files using the project explorer and set breakpoints by pressing F9.

Porting to the Target
Now that the Button demo application is ready and tested using the simulator (in both Web and Native mode), we are ready to port it to the target, which is a straightforward process.
From the Resource Management [MCC] tab, select the following components from Device Resources by clicking on the add icon under Libraries > Harmony > BSP > SAM 9x60 Curiosity BSP.
 Select Libraries > Harmony > Graphics > Templates > Legato Graphics w/ PDA TM5000 Display.

The project graph should now look as shown:

Disconnect LE Display Driver from MGS Web Simulator and connect it to LE LCDC Driver. Disconnect TMR from MGS Web Simulator and connect it to TC0.

Click MCC Generate.
From the Dashboard pane, click on the wrench icon 
to launch the project properties. Select Building from Categories and select the Execute this link after build checkbox and in the textbox enter:
${MP_CC_DIR}/xc32-objcopy -O binary ${DISTDIR}/${PROJECTNAME}.${IMAGE_TYPE}.elf ${DISTDIR}/harmony.bin
Build the project by pressing F11 from your keyboard or clicking the Clean and Build  icon.
icon.
This builds the project successfully for the target. You will find harmony.bin generated in the GFX_Sim_Button\GFX_Sim_Button.X\dist\default\debug folder.
Copy the from GFX_Sim_Button\GFX_Sim_Button.X\dist\default\debug folder to a fat formatted SD card. Copy the to the same SD card.
Connect the WVGA display to the SAM9X60 Curiosity board. Power the board by connecting a USB cable to J1. Insert the SD card to J3 and press the reset button.