Getting Started With Application Development Using MPLAB® for VS Code® Extensions
Purpose
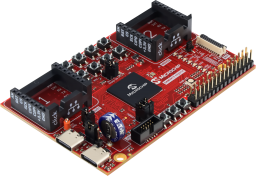
The purpose of this tutorial is to enable participants to develop an application for the SAM9X75 Curiosity Hybrid board using the MPLAB® for VS Code® Extensions, while gaining hands‑on experience with peripheral configuration through MPLAB Code Configurator (MCC). The purpose extended to familiarize participants with the end-to-end development workflow, including project setup for successful builds.
Overview
In this tutorial, attendees will gain hands‑on experience developing an application for the SAM9X75 Curiosity Hybrid Development Board using the MPLAB Extension for VS Code and Microchip’s code‑generation tools. The tutorial demonstrates a complete development workflow, from project creation and peripheral configuration to code generation using a practical, hardware‑based example.
The application developed in this tutorial is a patterned LED blinky that uses the Periodic Interval Timer (PIT) for timing and the serial console for runtime output. This example helps attendees understand how core peripherals are configured and integrated in an MPU‑based system while maintaining an MCU‑like development experience.
After completing this tutorial, attendees will know how to:
- Create a new application project using MPLAB Extensions for VS Code
- Add and configure peripheral support using MCC
- Generate C source code using MCC and integrate it into the project
Configure project settings, enabling users to efficiently develop and build applications
Hardware Pre-Requisite
- SAM9X75 Curiosity Hybrid evaluation board

- Two USB Type-C® cables
- Power the board via a 5V adapter through J14 or J1
- Jumper settings:
- Close 1-2 pins of jumper13 for the 5V power selection via FTDI USB(J14)
- Close 2-3 pins of Jumper13 for the 5V power selection via USB-A(J1)
- Close jumper J3 to enable VDDBU
Procedure
Part1: Creating an Application Using MPLAB Extension for VS Code
The first step is to launch VS Code.
To create a new MPLAB Harmony project, go to View > Command Palette > MPLAB: Welcome > Create New Project.
The next step in creating an MPLAB Harmony project is to define the following:
Specify the project name.
Select a custom project location.
Choose SAM9X75D2G MPU.
Choose the latest MPLAB XC32 Compiler (in this example 5.10) as shown in the accompanying image.

Once the project creation is complete, a VS Code message will pop up asking if it can trust the author. Confirm by clicking Yes, I trust the authors and proceed to the next step.

Observe that the MPLAB Harmony project for the SAM9X75 Curiosity hybrid development board has been created, and the initial setup is complete.

Now create the MCC configuration to add the necessary peripheral libraries essential for application creation. Go to View > Command Palette > MPLAB MCC: Launch.
Now, click Create New MCC Config, select the project to associate it with, and proceed with the default values. A pop-up will prompt you to download the latest SAM9X75 DFP pack. Click YES.

In addition to the required packages (csp), download the optional packages bsp, and core.
To do this, click on Device Resource, then Content Manager, choose bsp & core and then click Select Latest Version. The content download will take some time, so be patient and wait until all contents are downloaded. Then click Apply.
You can clone all the necessary peripherals required using the Content Manager.

The Project Graph window will be displayed. From the Device Resources window, click the add button next to SAM9X75 Curiosity BSP, which will add Board Support Packages reflected in the Project Graph.

Add the required peripheral to the Project Graph.
Add Debug UART (DBGU)
- In Device Resources > Peripherals, locate DBGU
- Double‑click DBGU to add it to the Project Graph
Purpose:
- Provides UART functionality over the on‑board FT4232HQ USB interface
- Used for console messages (printf output)
You will now see a DBGU Peripheral Library block in the graph.
Add STDIO Service
- In Device Resources > Tools, locate STDIO
- Double‑click STDIO to add it to the Project Graph
Purpose:
- Provides standard C I/O support (printf, puts, etc.)
- Acts as a bridge between the application and the DBGU
Connect STDIO to DBGU UART
- Click on UART in the Project Graph
- Under Available Consumers, select STDIO
- Connect UART to the STDIO consumer
Purpose:
- STDIO output is routed to the DBGU UART
- Console output appears on the host PC terminal via USB
Add PIT (Periodic Interval Timer)
- In Device Resources > Peripherals, locate PIT
- Double‑click PIT to add it to the Project Graph
Purpose:
- Generates periodic interrupts
- Used to control LED blinking patterns and timing

The project graph will appear as follows:

Refer to the hardware mapping section of the "SAM9X75 Curiosity Hybrid Kit User Guide" to verify the pin assignments for the user LED and DBGU.

Now launch the Pin Configuration tool in the Project Graph. To do this, go to the Project Graph, and choose Pin Configuration from the Plugins drop-down to configure the required pinout, referring to the "SAM9X75 Curiosity Hybrid User Guide" for correct assignments.

Verify the peripheral configurations by clicking on each peripheral in the project graph.


Generate the code by clicking the Generate button. Wait until the code generation is complete.

Now you can observe that C code for all the added peripherals is being generated.

Write main.c to create your own application integrating the PIT timer, serial console and the LED outputs.
Add MPLAB AI Coding Assistant to VS Code. See the "Getting Started With MPLAB® AI Coding Assistant" page.

Sample patterned LED blinky application and main.c file can be found in the class work folder under test_sam9x75_hybrid_curiosity/My_MCC_Config/src. You can copy this main.c to your project.
This completes the application development.
Part 2: Project Setup for Successful Builds
To build the project successfully, confirm the compiler details. To do this, go to Command Palette and launch MPLAB: Edit project properties (UI). Go to Toolchain and confirm that XC32 compiler is chosen.

By default, MPLAB X IDE only generates ELF and HEX format output files. To generate application output in binary format, a post-build step needs to be added to the project properties. To do this, go to Overview > Post-build Steps > Add Item. Then add the following command:

Note that the OpenOCD configuration files are in the project folder:
- sam9x75.cfg : It defines settings such as the interface, target device, transport, reset behavior, and JTAG/SWD parameters, which are essential for establishing the debug session.
- Copy the sam9x75.cfg file from the GitHub directory to the user project
- launch.json: It specifies details such as the executable file, GDB path, OpenOCD server connection, configuration files, and debug actions like reset, halt, load, and run.
- Copy the launch.json file from the GitHub folder to the user project/.vscode

Copy at91bootstrap.elf from GitHub into the ./binaries folder of the project directory. This at91bootstrap is used to debug a Harmony application in VS Code.

Project properties are configured with the required settings to ensure a successful and error-free build of the application.
Results
At the end of this tutorial, participants successfully created and built an application for the SAM9X75 using the MPLAB® Extension for VS Code. They configured the required peripherals using MPLAB® Code Configurator (MCC) and set up the necessary project properties to ensure a successful build.